Tutorial
Warning: This tutorial is deprecated as it describes working with an older version (3) of the Gadgetron.
This is a short tutorial of how to use the Gadgetron image reconstruction framework. We will be working with version 3.11.0-c2092576.
Here is a video walkthroug of the tutorial:
Prerequisites
- Some basic knowledge of MRI reconstruction
- Docker if you are working on a Linux computer or Docker Toolbox if you are on Windows or Mac.
- An HDF5 viewer. Here we use HDFView but you can also read the images into Matlab or Python for display.
TL;DR
In case you want to dig straight in:
$ docker run -t --name gt1 --detach --volume $(pwd):/opt/data gadgetron/ubuntu_1404_cuda75
This will (first download and then) launch the Gadgetron in a Docker container. It will also mount your current folder as a data folder inside the container. To enter the container:
$ docker exec -ti gt1 /bin/bash
Inside the container generate some data:
$ cd /opt/data
$ ismrmrd_generate_cartesian_shepp_logan
Send the data for reconstruction in the Gadgetron:
$ gadgetron_ismrmrd_client -f testdata.h5 -c default.xml -o out.h5
Open the out.h5 file with an application such as HDFView and look at the image.
For more details read the complete tutorial below.
Running the Gadgetron using Docker
If you would like to compile and install the Gadgetron and dependencies on your own system, please consult the Gadgetron Wiki. We will use Docker images to simplify this procedure.
The easiest way to get the Gadgetron installed is by using one of our pre-built and tested Docker images, which are available on Docker Hub. The most complete image (in terms of compiled features) is gadgetron/ubuntu_1404_cuda75 which includes all GPU dependent libraries. If you don’t have a GPU on your machine or if you are running the Docker container on a Windows or Mac computer (where your GPU would not be accesible), you can grab the gadgetron/ubuntu_1404_no_cuda. For the purposes of this tutorial, either will do.
To get started open up a shell/terminal where you have access to Docker. This can either be your standard shell on Linux or the “Docker Quickstart Terminal” on Mac or Windows. In the terminal type:
$ docker pull gadgetron/ubuntu_1404_cuda75
If this is the first time you pull this image, it could take a few minutes depending on network bandwidth and other issues. Once the pull is complete, you should be able to type:
$ docker images
And see the available images on your machine:
REPOSITORY                     TAG                 IMAGE ID            CREATED             SIZE
gadgetron/ubuntu_1404_cuda75   latest              d698dcb1452b        20 hours ago        4.763 GB
To start a container using this image, we will use the command:
$ docker run -t --name gt1 --detach --volume $(pwd):/opt/data gadgetron/ubuntu_1404_cuda75For a complete list of all the docker run options, please refer to the Docker documentation. The -t attaches a pseudo TTY to the container to enable us to have command line access (see later), --detach puts the container in the background, --name gives the container a convenient name (we will use that later), and --volume $(pwd):/opt/data maps the current directory (pwd) into a folder called /opt/data inside the container. If you execute that command from a folder where you have to data to process, you will have access to that data inside the container. If you would like to map some other folder than your current directory, you would type:
$ docker run -t --name gt1 --detach --volume /path/you/would/like/to/mount:/opt/data gadgetron/ubuntu_1404_cuda75After starting the container, you can verify that it is running:
$ docker psyou should see that you have the Gadgetron container running:
CONTAINER ID        IMAGE                          COMMAND                  CREATED             STATUS              PORTS               NAMES
e550555a4858        gadgetron/ubuntu_1404_cuda75   "/usr/bin/supervisord"   2 minutes ago       Up 2 minutes                            gt1
You are now ready to run Gadgetron reconstructions.
One note regarding access to GPU inside the container. At the moment this only works on Linux machines. NVIDIA provides a drop-in replacement for the docker command called nvidia-docker, which you can find here. We also provide a script in the Gadgetron code, which performs a similar function. These tools will expose the GPU inside the container and allow you to do GPU reconstructions. For more details, please consult the Wiki.
Running the Hello World example
First step to working with the running Gadgetron is to get a command line (shell) inside the container:
$ docker exec -ti gt1 bash
The -ti options give us an interactive terminal, gt1 refers to the name of the container that we used above and bash is the command to execute inside the container.
Once you are inside the container, you can navigate to the data folder that we mapped:
$ cd /opt/data
If you had any data files in your current directory when you started the container, you should see them here by typing ls. We will not assume that you have any data yet, so we will use the ismrmrd_generate_cartesian_shepp_logan application from the ISMRMRD package to generate a dataset.
$ ismrmrd_generate_cartesian_shepp_logan
Generating Cartesian Shepp Logan Phantom!!!
Acceleration: 1
For more options for this application you can type ismrmrd_generate_cartesian_shepp_logan -h. The application should generate a testdata.h5 file in your current folder, which will contain a simulated dataset in ISMRMRD format
To reconstruct the test data type:
$ gadgetron_ismrmrd_client -f testdata.h5 -o out.h5 -c default.xmlThe -f option is the input file, -o is the output file and -c indicates the Gadgetron reconstruction that should be run. The gadgetron_ismrmrd_client has a few options, which you can list with gadgetron_ismrmrd_client -h. As indicated by the name, this program is a client, which connects (via a TCP/IP connection) to a Gadgetron server. This server is already running in the container and receiving connections on port 9002, which is the default port for the Gadgetron. If you want to connect to a Gadgetron running on a different port, use the -p argument.
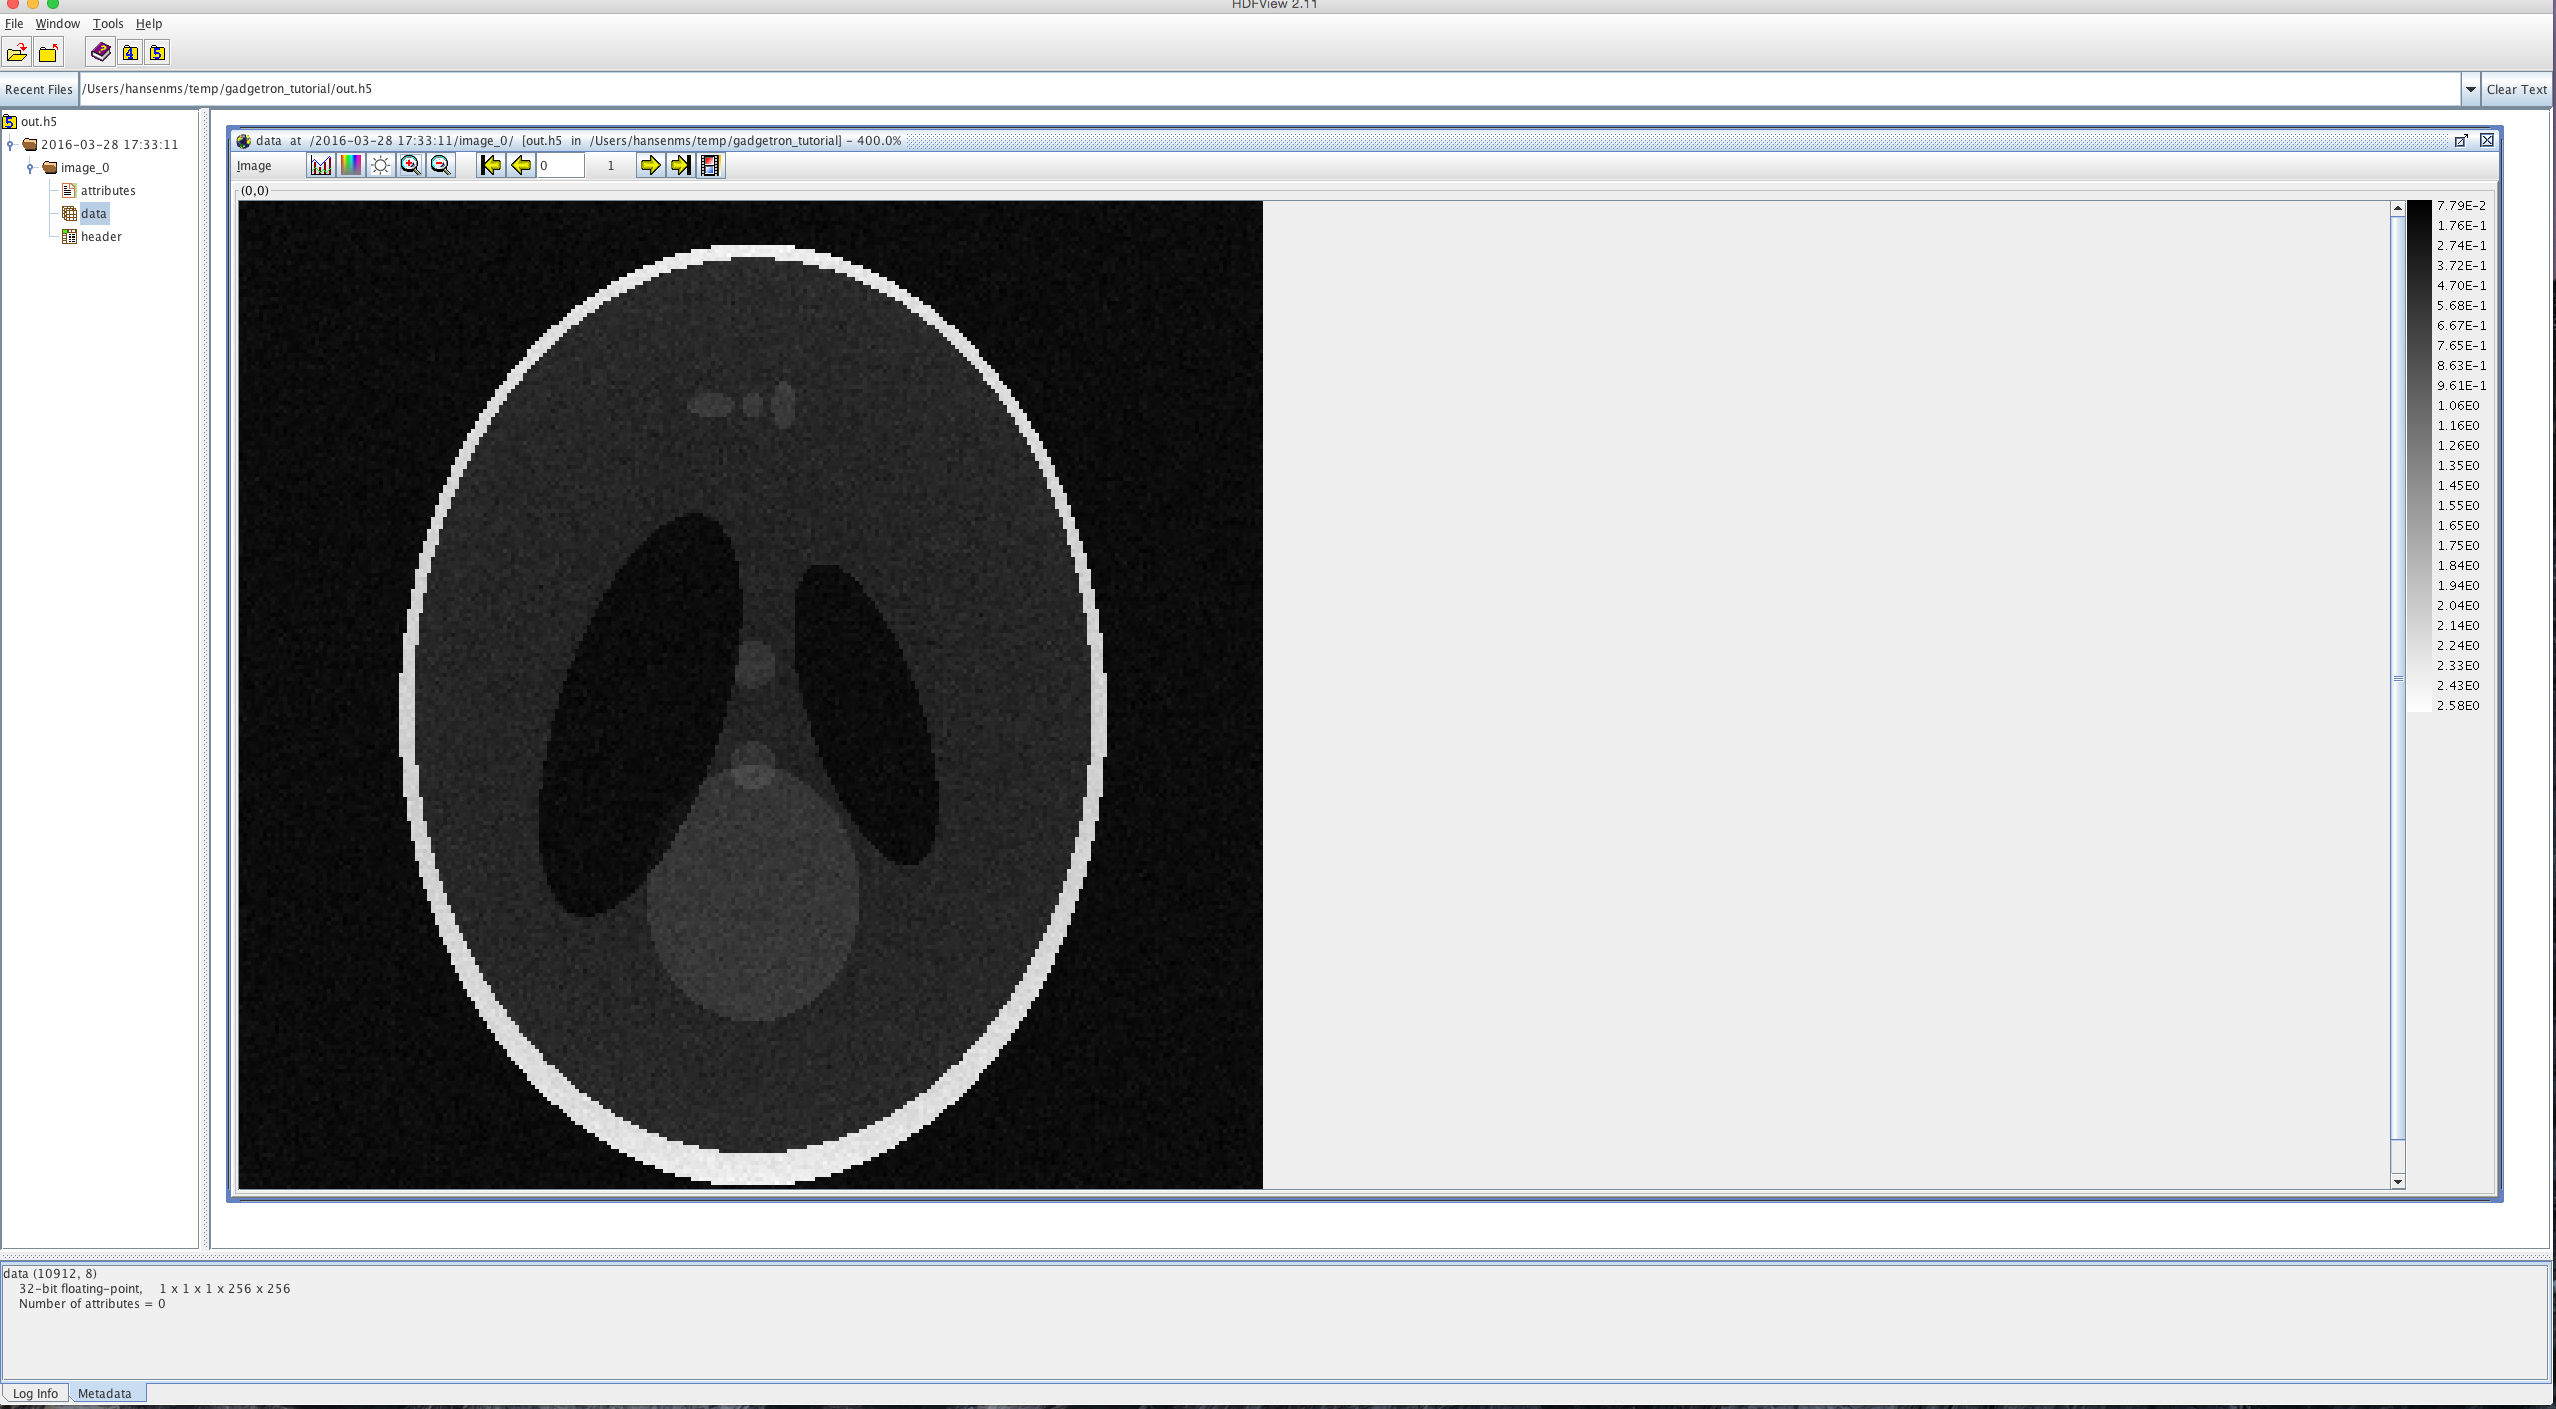
After running the reconstruction, you can open up the out.h5 file in HDFView. When you run a new reconstruction, the default behavior of the gadgetron_ismrmrd_client is to append another group to the HDF5 file with the current date and time. If you keep running reconstructions they will be appended to the time file and organized by time. If you navigate to the image_0/data variable under the last recon group, you can right-click and select “Open As”. This will bring up a dialog window where you can select “Image” and specify the ordering of the dimensions to display. If you select “Height” to be “dim 3”, “Width” to be “dim 4” and “Depth” to be “dim 0”, you should be able to view the resulting image as illustrated below:
Modifying a reconstruction
Next step is to modify the reconstruction program that we just used. We will add a raw data filter.
Before we get to that, let’s take a closer look at the XML files that define reconstruction programs. You will find the available configurations in /usr/local/share/gadgetron/config. If you open up the default.xml program that we used above, you will see that it consists of reader, writer, and gadget definitions. The readers and writers represent the datatypes that this reconstruction program will be able to read (receive) from and write (return) to the client. The default chain is able to read ISMRMRD acquisitions and write MRI images:
    <reader>
      <slot>1008</slot>
      <dll>gadgetron_mricore</dll>
      <classname>GadgetIsmrmrdAcquisitionMessageReader</classname>
    </reader>

    <writer>
      <slot>1022</slot>
      <dll>gadgetron_mricore</dll>
      <classname>MRIImageWriter</classname>
    </writer>
The Gadgets represent signal processing modules. The data passes from one module to the next. Each of the gadget definitions consist of a name, a shared library (DLL) that this Gadget is found in, and the class name of the Gadget. For instance
    <gadget>
        <name>RemoveROOversampling</name>
        <dll>gadgetron_mricore</dll>
        <classname>RemoveROOversamplingGadget</classname>
    </gadget>
adds a Gadget with a class name of RemoveROOversamplingGadget from the shared library gadgetron_mricore. On Linux, this library would be called libgadgetron_mricore.so. You can find more details about this Gadget with the command
$ gadgetron_info gadgetron_mricore RemoveROOversamplingGadget
The tool gadgetron_info can give you information about the computer running the Gadgetron and which version of the software you are running. If you ever need to report a problem or a bug, please include the output of gadgetron_info.
The default.xml chain contains the following Gadgets:
RemoveROOversamplingGadget: Removes the readout oversamplingAcquisitionAccumulateTriggerGadget: Collects lines of k-space until a certain trigger condition is encountered, i.e., when there is enough data to reconstruct an image.BucketToBufferGadget: Inserts the collected data into a buffer more suitable for recon processing.SimpleReconGadget: Performs a simple FFT reconstruction.ImageArraySplitGadget: The previous Gadget may return an array of images and this Gadget splits them into individual images.ExtractGadget: Extracts the magnitude of the complex images.ImageFinishGadget: Returns the image to the client.
Our task of inserting a raw data filter is now as simple as inserting a Gadget in the beginning of the chain. Most of the Gadgets in the Gadgetron are written in C++ but they can also be written in scripting languages (Python or Matlab). To illustrate this, we will write a Python Gadget.
Simply open up a text editor and start editing a file called /usr/local/share/gadgetron/python/FilterGadget.py. emacs and vim are available in the container. Enter the following code:
import numpy as np
from gadgetron import Gadget

class RawFilter(Gadget):
    def process(self, head, data):
        filt = np.reshape(np.hanning(data.shape[0]),(data.shape[0],1))
        data2 = data * filt
        self.put_next(head,data2)
        return 0
Now we need to add this Gadget to the default.xml chain. It is recommended that you copy the default.xml chain to a new file first:
$ cd /usr/local/share/gadgetron/config
$ cp default.xml default_filter.xml
Now edit the default_filter.xml file and add the following gadget definition before the RemoveROOversamplingGadget definition:
    <gadget>
      <name>FilterGadget</name>
      <dll>gadgetron_python</dll>
      <classname>PythonGadget</classname>
      <property>
        <name>python_module</name>
        <value>FilterGadget</value>
      </property>
      <property>
        <name>python_class</name>
        <value>RawFilter</value>
      </property>
    </gadget>
Save the file and now run your new reconstruction on the test data that we created above:
$ gadgetron_ismrmrd_client -f testdata.h5 -o out.h5 -c default_filter.xml
The figure below illustrates the result from the Hello World example side by side with the result from the new chain. It should be clear that the new result is filtered.

Converting and Reconstructing real data
The examples above used simulated data. You would of course want to use real data. Since the Gadgetron supports the ISMRMRD format for MRI data, you can use the Gadgetron as long as you can convert your data to ISMRMRD format. Please look at the ISMRMRD Github for a converter for your preferred vendor. The Docker image comes with some converters already installed. In this example, we will convert a Siemens raw data file to ISMRMRD format and reconstruct it.
In this example we will use the meas_MID03485_FID51095_se.dat file from the ISMRMRD paper raw dataset which can be downloaded from http://dx.doi.org/10.5281/zenodo.33166. Download the file and place it in the folder that is mounted inside the Docker container.
The example dataset is a more complicated case. The meas_MID03485_FID51095_se.dat file actually contains two measurements: 1) a noise calibration and 2) the actual measurement data. The noise data can be used for noise prewhitening. To convert the file type:
$ siemens_to_ismrmrd -f meas_MID03485_FID51095_se.dat -z 1 -o noise.h5
$ siemens_to_ismrmrd -f meas_MID03485_FID51095_se.dat -z 2 -o data.h5
This puts the first measurement (-z 1) into a file called noise.h5 and the measurement data into a file called data.h5. We can run these through the Gadgetron one after another. First the noise:
$ gadgetron_ismrmrd_client -f noise.h5 -c default_measurement_dependencies.xml
This will not actually produce any images, it will simply process the noise data and store it in the Gadgetron. Then we run the actual scan:
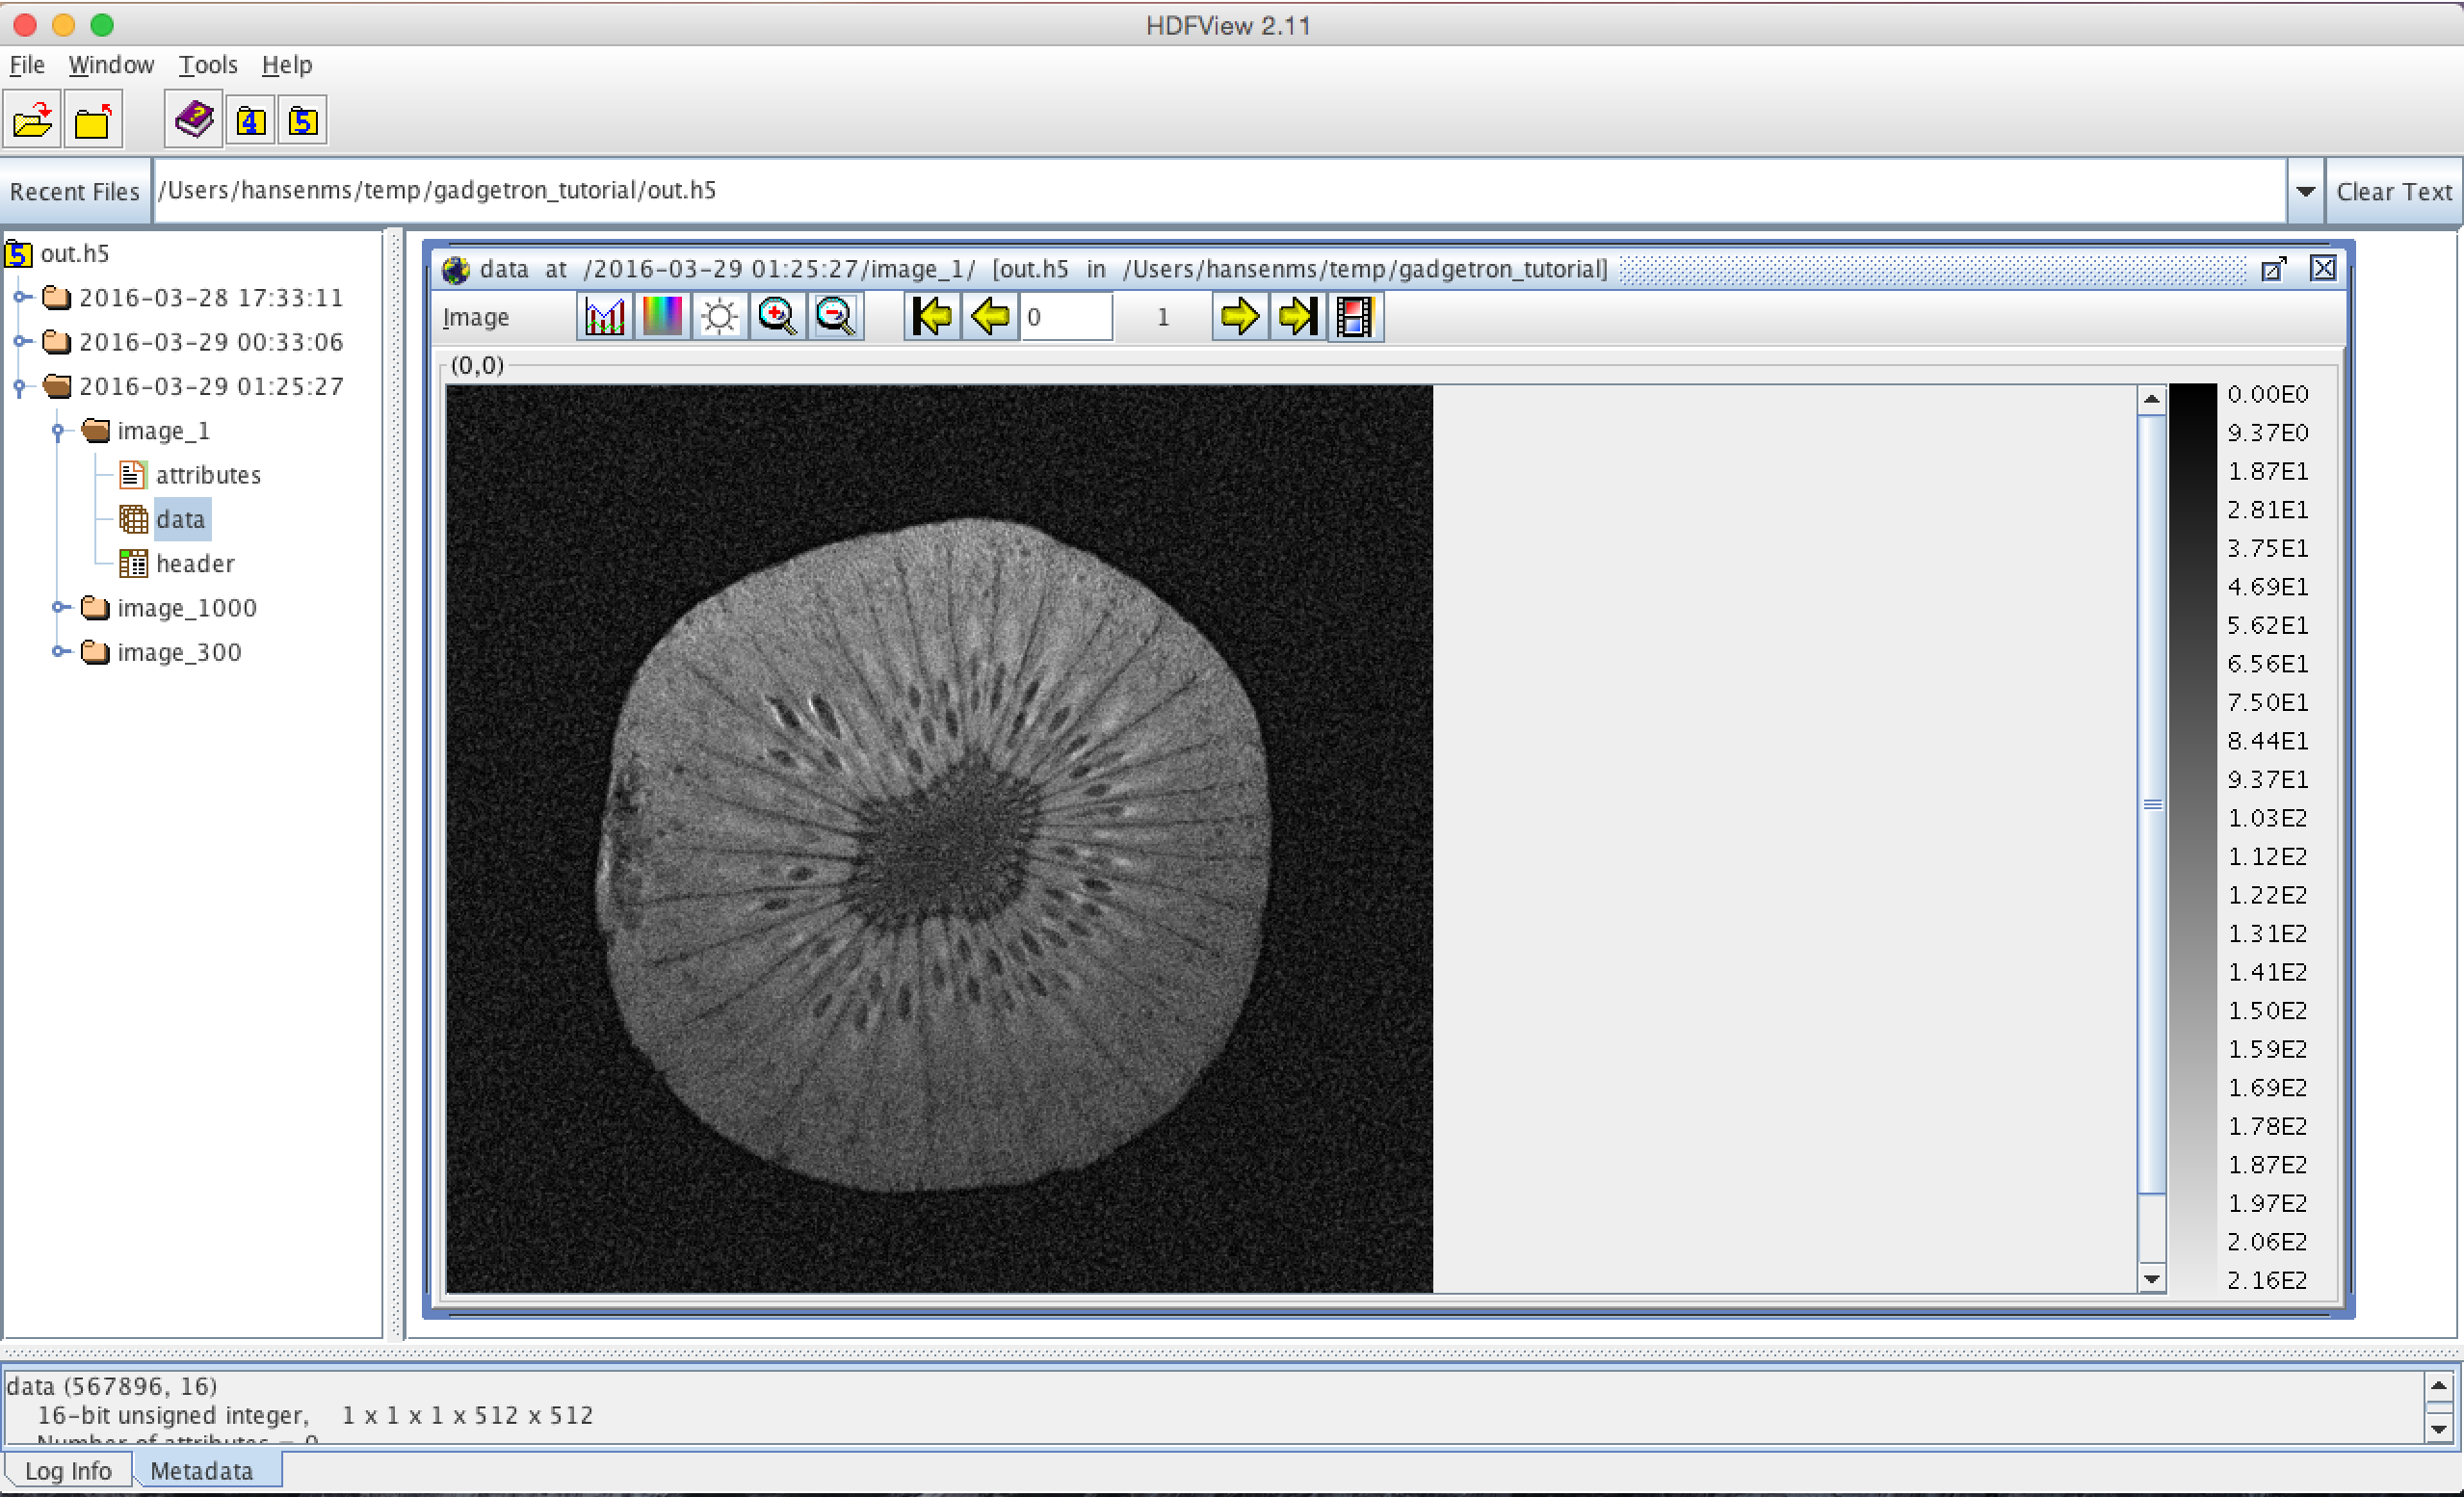
$ gadgetron_ismrmrd_client -f data.h5 -c Generic_Cartesian_Grappa_SNR.xml
This will produce a new group in the out.h5 file. If we look at the first image series image_0 in that, we should see an image:
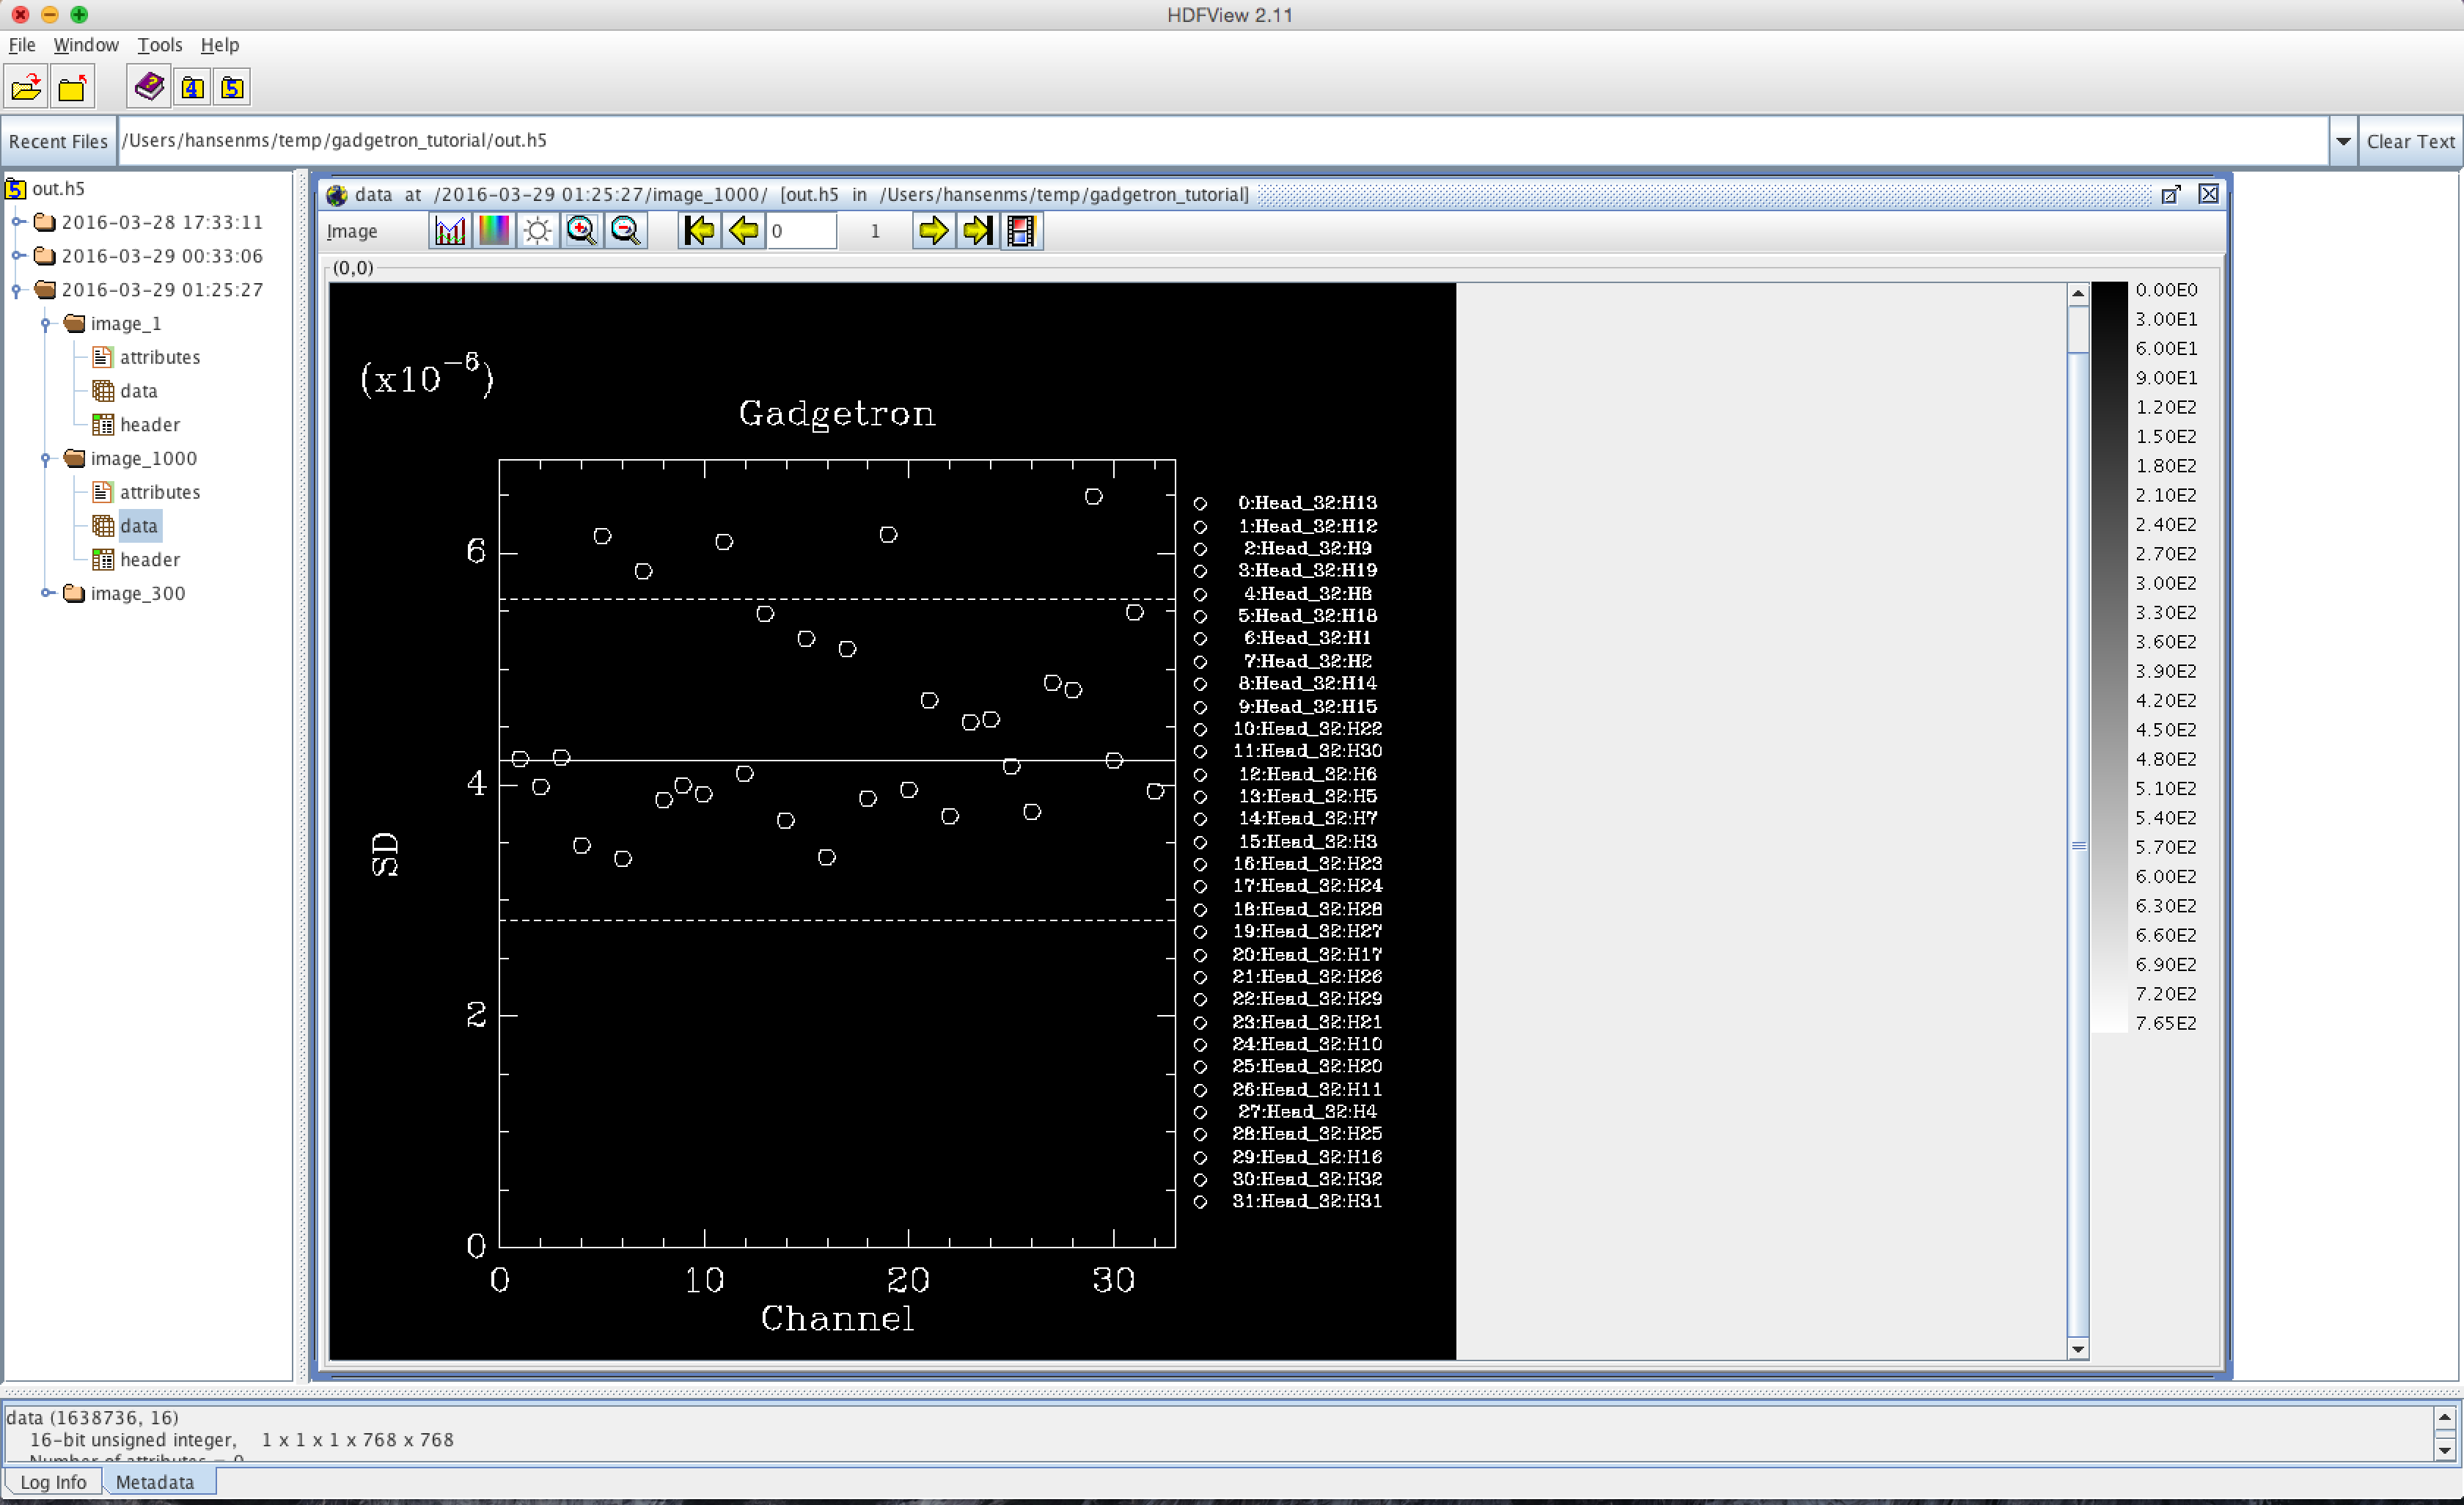
You will notice that this reconstruction produce other image series as well. How many depends on whether this scan uses parallel imaging or not. The image_300 series is an image scaled to units of SNR and the image_1000 series is a plot of the noise standard deviation in each channel. This is a very useful plot for coil QA:
Next Steps
This concludes the brief tutorial of the Gadgetron. You should explore the /usr/local/share/gadgetron/config folder where you will find many different reconstruction programs. You can also try to implement the raw filter Gadget from above in C++. A good place to start would be the AcquisitionPassthroughGadget, which could easily be modified to filter the data rather than let it pass straight through.